|
Installation
The installation of JStrangeDownloader is relatively
straight forward.
- Downloading the software
Prior to installing the software, you must download the latest
version. The current version of JStrangeDownloader can be found
HERE. Go ahead and download the software by
clicking on the file that you would like, and then clicking the link
to download it. Like this:

and then...

Now save this file somewhere on you computer, but remember where you
save it.
- Installing JStrangeDownloader
Remember where you put that
file from step one? Good. Now find it, and double click it to run the
installation program.
The installation program for JStrangeDownloader is very
straightforward, as you cannot specify any values. You must accept the
default values for everything.
Click "Next", or "OK" through the install, until it says that you've
successfully installed the program.
- Router/Firewall configuration
NOTE: Skip on to the next section if you are not behind a
firewall/router
If you are behind a router or firewall, now is the time to configure
your router/firewall so that it forwards a port to your machine.
Unfortunately, I cannot tell you how to do this for your specific
router/firewall. Read the documentation which came with your router to
find out how. If you still have troubles, post a message to the forums
(http://strangedownload.sf.net/forums)
and i'm sure someone will know the answer. I can, however, give you a
basic overview of what needs to be done.
There are two scenarios for forwarding a port:
- You are going to be using JStrangeDownloader's
built-in FTP server
JSD's built in FTP server runs on
port 2001.
Therefore, you will need to set up your router/firewall to forward
port 2001 to your machine.
- You will be using your own, separate FTP
server
You will need to make note of the port
number that you've set your FTP server on. Typically, FTP server's
run on port 21, but yours may differ.
Whatever port this is will be the one that you need to have
forwarded to your machine.
NOTE: I would advise
against running your FTP server on port 21. Some routers
historically have modified traffice on port 21 to disallow PASV
connections, thus rendering JSD useless. This can be avoided by
simply setting up your FTP server to run on a port other than 21.
- Registry entry installation
Windows users will want to install the
registry entries so that they can click on files on the website and
have them be downloaded by JStrangeDownloader automagically.
To do this, click on the "Install JSD Registry Entries" link on
your Start Menu under JStrangeDownloader.
This will run the installation program for the registry entries. After
finishing the installation, you will then be able to search for and
download files using
http://jsd.dustyd.net
- Program
configuration
Here is where we will run JStrangeDownloader
for the first time, causing the JSD Configurator to run to walk us
through setting up JSD for use.
First, go ahead and start JStrangeDownloader...

This should present you with a message box stating that
there was an error reading the options file. Go ahead and press "OK"
to start the JSD Configurator.
This will display the JSD Configurator.
- JSD Configurator - Step 1
Step 1 is just an introduction, so read
through what it has to say, and then when you're ready, click
"Next=>" to continue...
- JSD Configurator - Step 2
Step 2 is to determine your external IP
address. That is, the IP address that ISU's servers will be able to
connect to your machine on. You are presented with a window that
looks like this:

If you are behind a firewall/router, this is NOT the ip address of
your machine. This would in that case be the IP address of your
router/firewall. JSD is pretty good at guessing the correct answer,
and it will highlight it for you.
NOTE: The IP address
you select WILL NOT be one of the following: 10.*.*.*, 192.168.*.*,
172.16.*.*, 127.0.0.1
- JSD Configurator - Step 3
Next we must fill out the Telnet Options.
This step is quite easy, you simply fill in your ISU Username and
password.
Your ISU username is the part of your ISU email address before
the @iastate.edu

When you are satified with your entries,
press "Next=>" to continue...
- JSD Configurator - Step 4
In this step we will upload some necessary
files to your Project Vincent account. Press the "Click here to
upload the files to PV..." button to begin this process.
You will notice the progress bar running while its transferring...

Note that this may take a while, depending
on your connection speed. It must upload approximately 800KB of data
to the PV servers. When it has completed, the "Next=>" button will
be enabled... Click on it to continue...
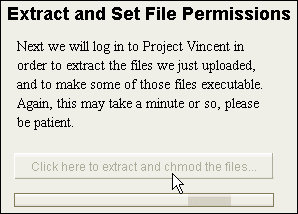
- JSD Configurator - Step 5
During this step, the JSD Configurator
will log in to your Project Vincent account and will extract those
files which we just uploaded in the previous step. Again, press the
"Click here to extract and chmod the files..." button to
accomplish this.

When it is complete, the progress bar will
go away and the "Next=>" button will be enabled. Click it to go on
to the next step...
- JSD Configurator - Step 6
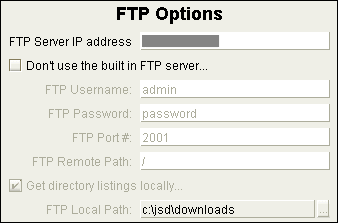
Step 6 is the FTP Options screen. This can
be the trickiest part of the install to get right.
If you are using the built-in FTP server, your screen will look like
this:

If you
are indeed planning on using the built in FTP server, you may
continue on to the next step. There is nothing to be configured.
...
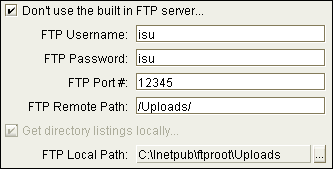
However, if you are using another FTP
server, check the "Don't use the built in FTP server..." checkbox to
enable the FTP settings.

FTP Username: The username needed
to log on to your FTP server. This user will need write access to
some directory.
FTP Password: That user's password.
FTP Port #: The port you have your FTP server set up on.
(NOTE: If you are behind a firewall/router, I would suggest not
running your server on port 21. See the Routers/Firewalls section
above..)
FTP Remote Path: This is the location where the FTP client
will put the files. If you would just like them in the root of your
FTP server (assuming that user can write there), just use "/"
(without the quotes). If however, there is another directory where
you'd like those files (say, an Uploads directory), then you must
specify it. i.e "/Uploads/"
NOTE: This value must have a
trailing slash.
FTP Local Path: This is the location on your computer
where the files will end up. Click the "..." button to browse
for a directory.
When you are satisfied with your settings, click "Next=>" to
continue...
- JSD Configurator - Step 7
Step 7 is the final step, and it is where
we verify the FTP setting that you entered in the previous step.
Like before, click the "Click here to verify your FTP settings..."
button to start this process...

NOTE: This
process may take a while, especially if your FTP settings are not
correct. (In which case you must wait for it to time out).
When this has completed successfully, the "Next=>" button
will be enabled. Click it to continue...
- JSD Configurator - Step 8
Congratulations!!! You have successfully set up JStrangeDownloader!
- Basic Usage of JStrangeDownloader
Coming soon...
|